欢迎来到逆向世界
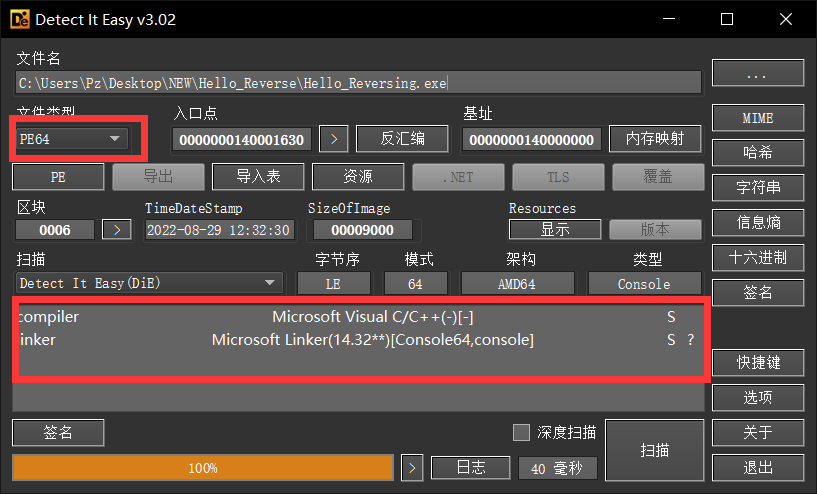
Hello_Reverse 0x00 Daily Shell Check 一般对一个程序进行逆向,要懂得该文件的基本信息,PE文件ELF等等,那对于CTF逆向题,我们一般所做的就是先查壳
一开始看不懂这么多信息没关系,关注这是PE文件64位 和无壳 即可
0x01 Analyze Main Function 那么这题运行一下就知道就是要我们找flag,在主函数已经找到了flag的后半截3vers1ng_w0rld},再去找找前半截即可
1
2
3
4
5
6
7
8
9
10
11
12
13
14
15
16
17
18
19
20
21
int __cdecl main (int argc, const char **argv, const char **envp) int i; int v5; char Source[16 ]; char Destination[24 ]; strcpy (Source, "3vers1ng_w0rld}" ); sub_140001230("%s\n" , off_140005000[0 ]); sub_140001230("%s\n" , off_140005008[0 ]); sub_1400012B0("%s" , Destination); for ( i = 0 ; i < strlen (Str); ++i ) sub_140001230("%c" , (unsigned int )Str[i]); v5 = 0 ; do sub_140001230 ("%c" , (unsigned int )off_140005018[v5++]) ; while ( off_140005018[v5] ); strcpy (Destination, Source); system("pause" ); return 0 ; }
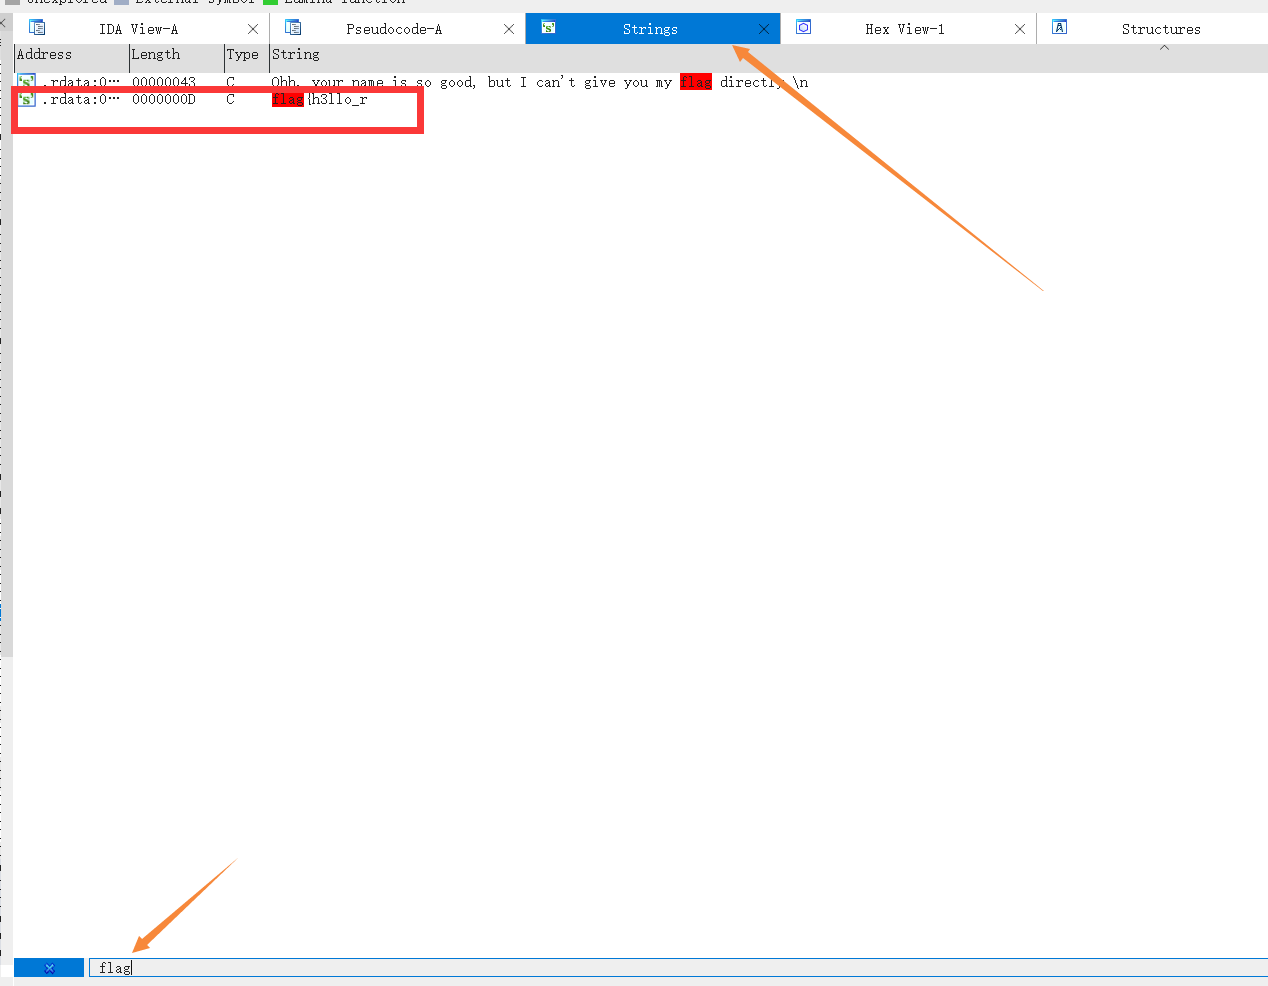
0x02 GetFlag 这时候就有个好用的快捷键就是shift + F12,搜索整个文件的字符,即可拿到前半串flag
GetFlag!
1 flag{h3llo_r3vers1ng_w0rld}
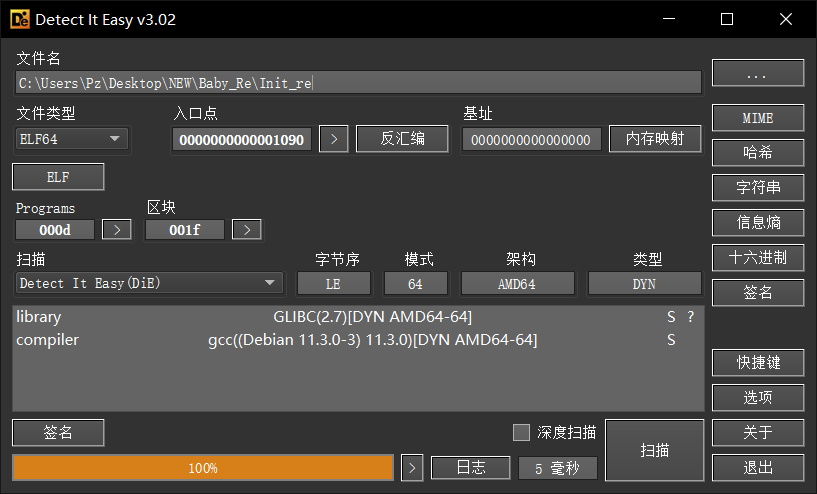
Baby_Re 0x00 Daily Shell Check 无壳64位
0x01 Init 可以发现我们的输入经过了异或自身下标的操作,随后进去compare函数
1
2
3
4
5
6
7
8
9
10
11
12
13
14
15
16
17
18
19
20
21
22
23
24
25
26
27
28
29
30
31
int __cdecl main (int argc, const char **argv, const char **envp) size_t v3; char input[8 ]; __int64 v6; __int64 v7; __int64 v8; char v9; int i; *(_QWORD *)input = 0LL ; v6 = 0LL ; v7 = 0LL ; v8 = 0LL ; v9 = 0 ; puts ("Welcome to RE world,Can you solve the problem?" ); printf ("Now you should input your flag and i'll tell you if it is right:" ); __isoc99_scanf("%s" , input); for ( i = 0 ; ; ++i ) { v3 = i; if ( v3 >= strlen (input) ) break ; input[i] ^= i; } if ( (unsigned int )compare(input) ) puts ("Well done! You find the secret!" ); else puts ("The flag is wrong! Maybe something run before main" ); return 0 ; }
可以发现直接与密文比较,那么直接提取密文与自身下标异或
1
2
3
4
5
6
7
8
9
10
11
12
13
14
15
16
__int64 __fastcall compare (const char *a1) int i; if ( strlen (a1) != 32 ) { puts ("The length of flag is Wrong!!" ); exit (0 ); } for ( i = 0 ; i <= 31 ; ++i ) { if ( final [i] != a1[i] ) return 0LL ; } return 1LL ; }
然后就上当
加载一个程序并不是从main函数最先开始,而是一个init段
简单来说程序的运行流程
那么!对抗这种Init段该了些数值的办法一个是动调(下题会讲,一会有回来试试)
另一个就是 X!交叉引用
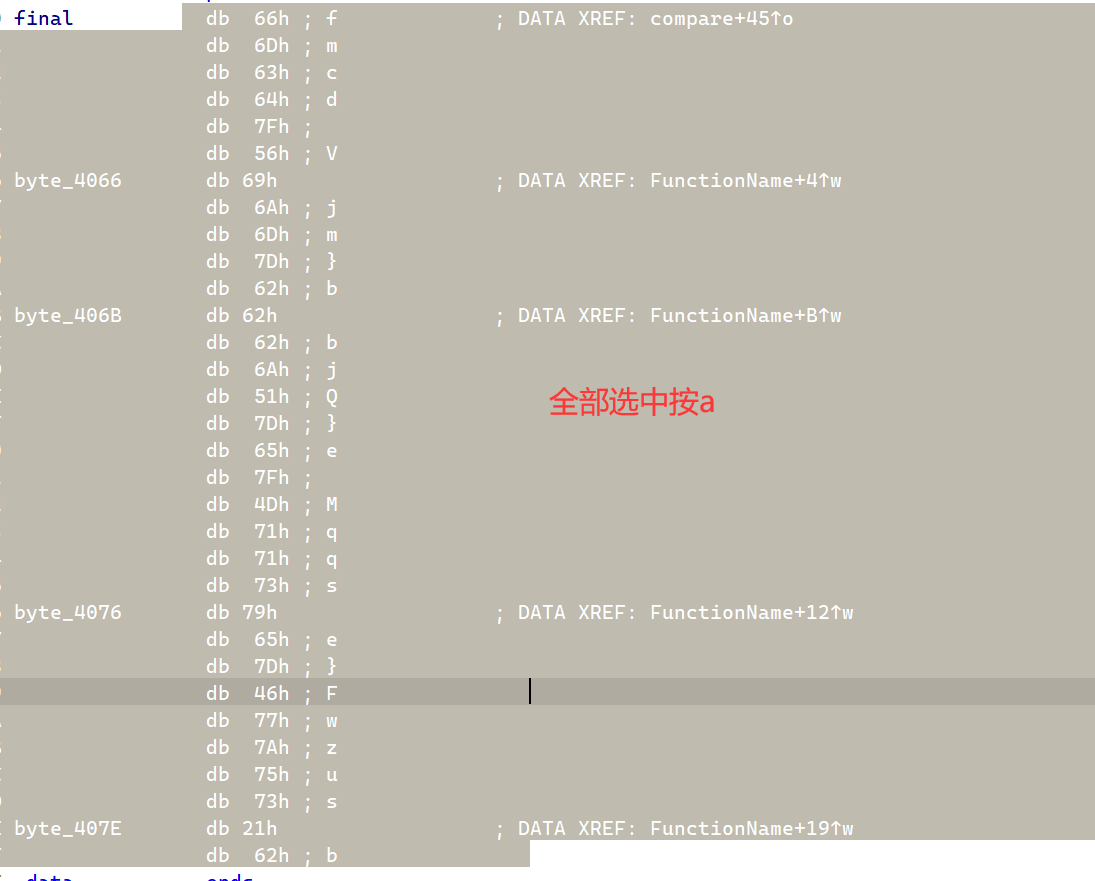
0x02 GetFlag 首先我们点进final这个数组,这里按a是为了能找到哪里引用了此字符串
随后在任意点入一个引用
即可在目标地方发现了改了密文的地方,也就是说程序真正验证的时候密文是用此比较
1
2
3
4
5
6
7
void FunctionName () final [6 ] = 54 ; final [11 ] = 58 ; final [22 ] = 38 ; final [30 ] = 63 ; }
那么拿到正确密文
GetFlag!
1
2
3
4
5
enc = [0x66, 0x6D, 0x63, 0x64, 0x7F, 0x56, 0x36, 0x6A, 0x6D, 0x7D, 0x62, 0x3A, 0x62, 0x6A, 0x51, 0x7D, 0x65, 0x7F, 0x4D, 0x71, 0x71, 0x73, 0x26, 0x65, 0x7D, 0x46, 0x77, 0x7A, 0x75, 0x73, 0x3F, 0x62] for i in range(len(enc)): print(chr(enc[i] ^ i), end = "") #flag{S0meth1ng_run_bef0re_main!}
Pyre 0x00 Python逆向 对几种常见Python逆向做了个总结
https://www.bilibili.com/video/BV1JL4y1p7Tt/?spm_id_from=333.337.search-card.all.click
0x01 GetSource 那么这种打包成exe的python文件,我们一般用此来解包
1 https://github.com/extremecoders-re/pyinstxtractor
那么拿到该解包文件再放到题目的根目标解包
1 python3 .\pyinstxtractor.py pyre.exe
随后再用一个反编译pyc的工具即可
1 uncompyle6.exe .\pyre.pyc
该uncompyle6直接 pip3 install uncompyle6 下载即可
随后就可以进行快乐的Python逆向了
1 2 3 4 5 6 7 8 9 10 11 12 13 14 15 16 17 18 19 20 21 22 23 24 25 26 27 28 flag = '' encode = 'REla{PSF!!fg}!Y_SN_1_0U' table = [7 , 8 , 1 , 2 , 4 , 5 , 13 , 16 , 20 , 21 , 0 , 3 , 22 , 19 , 6 , 12 , 11 , 18 , 9 , 10 , 15 , 14 , 17 ] def enc (input tmp = '' for i in range (len (input )): tmp += input [table[i]] return tmp if __name__ == '__main__' : print ('Please input your flag:' ) flag = input () if len (flag) != 23 : print ('Length Wrong!!' ) else : final = enc(flag) if final == encode: print ('Wow,you get the right flag!!' ) else : print ('Sorry,Your input is Wrong' )
0x02 GetFlag 可以发现我们的输入只是进行了经过table表的下标混淆,直接经过table表还原即可
1
2
3
4
5
6
7
table = [7 , 8 , 1 , 2 , 4 , 5 , 13 , 16 , 20 , 21 , 0 , 3 , 22 , 19 , 6 , 12 , 11 , 18 , 9 , 10 , 15 , 14 , 17 ] flag = 'REla{PSF!!fg}!Y_SN_1_0U' for i in range (len (flag)): print (flag[table.index(i)], end = "" )
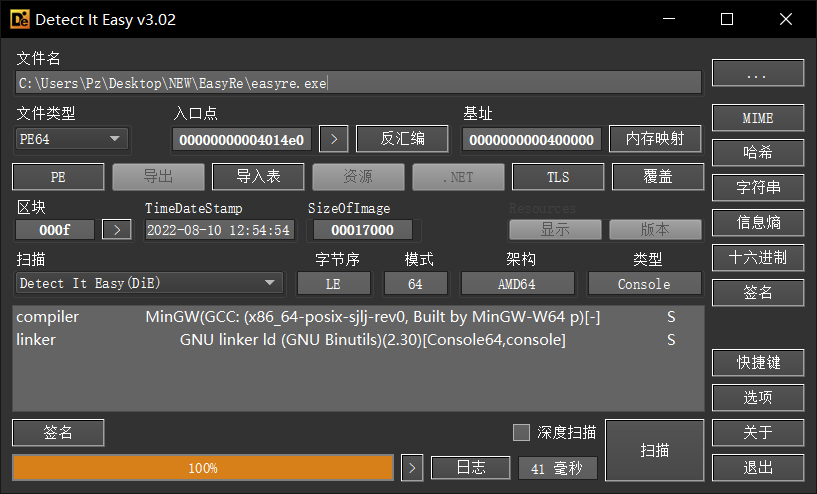
EasyRe 0x00 Daily Shell Check 无壳64位,然而这题还有个dll,可以把dll理解成一个函数库,我们的主程序在里面获取我们想要的函数即可
0x01 easyre.exe 那么首先看我们的主程序,那么我们在这里就知道两个信息即可
我们的密文是什么
我们的明文经过了dll函数库中一个encode函数的加密,随后出来和密文比较
1
2
3
4
5
6
7
8
9
10
11
12
13
14
15
16
17
18
19
20
21
22
23
24
25
26
27
28
29
30
31
32
33
34
35
36
37
38
39
40
41
42
43
44
45
46
47
48
49
50
51
52
53
54
55
56
57
58
59
60
61
62
63
64
65
66
67
68
69
70
71
72
int __cdecl main (int argc, const char **argv, const char **envp) char Str2[96 ]; int v5; char input[96 ]; int v7; char Str1[96 ]; int v9; FARPROC ProcAddress; HMODULE hModule; _main(argc, argv, envp); memset (Str1, 0 , sizeof (Str1)); v9 = 0 ; memset (input, 0 , sizeof (input)); v7 = 0 ; memset (Str2, 0 , sizeof (Str2)); v5 = 0 ; memset (Str2, 8 , 2 ); Str2[2 ] = 14 ; Str2[3 ] = 13 ; Str2[4 ] = 40 ; Str2[5 ] = 64 ; Str2[6 ] = 17 ; Str2[7 ] = 17 ; Str2[8 ] = 60 ; Str2[9 ] = 46 ; Str2[10 ] = 43 ; Str2[11 ] = 30 ; Str2[12 ] = 61 ; Str2[13 ] = 15 ; Str2[15 ] = 3 ; Str2[16 ] = 59 ; Str2[17 ] = 61 ; Str2[18 ] = 60 ; Str2[19 ] = 21 ; Str2[20 ] = 40 ; Str2[21 ] = 5 ; Str2[22 ] = 80 ; Str2[23 ] = 70 ; Str2[24 ] = 63 ; Str2[25 ] = 42 ; Str2[26 ] = 57 ; Str2[27 ] = 9 ; Str2[28 ] = 49 ; Str2[29 ] = 86 ; Str2[30 ] = 36 ; Str2[31 ] = 28 ; qmemcpy(&Str2[32 ], "?$P<,%#K" , 8 ); hModule = LoadLibraryA("enc.dll" ); if ( !hModule ) { puts ("Dll Loading Failed" ); exit (0 ); } ProcAddress = 0 i64; ProcAddress = GetProcAddress(hModule, "encode" ); if ( !ProcAddress ) { puts ("Get Function Failed" ); exit (0 ); } printf ("Please input your flag:" ); scanf ("%s" , input); ((void (__fastcall *)(char *, char *))ProcAddress)(input, Str1); if ( !strcmp (Str1, Str2) ) puts ("Your input is right:)" ); else puts ("The flag is Wrong:(" ); FreeLibrary(hModule); return 0 ; }
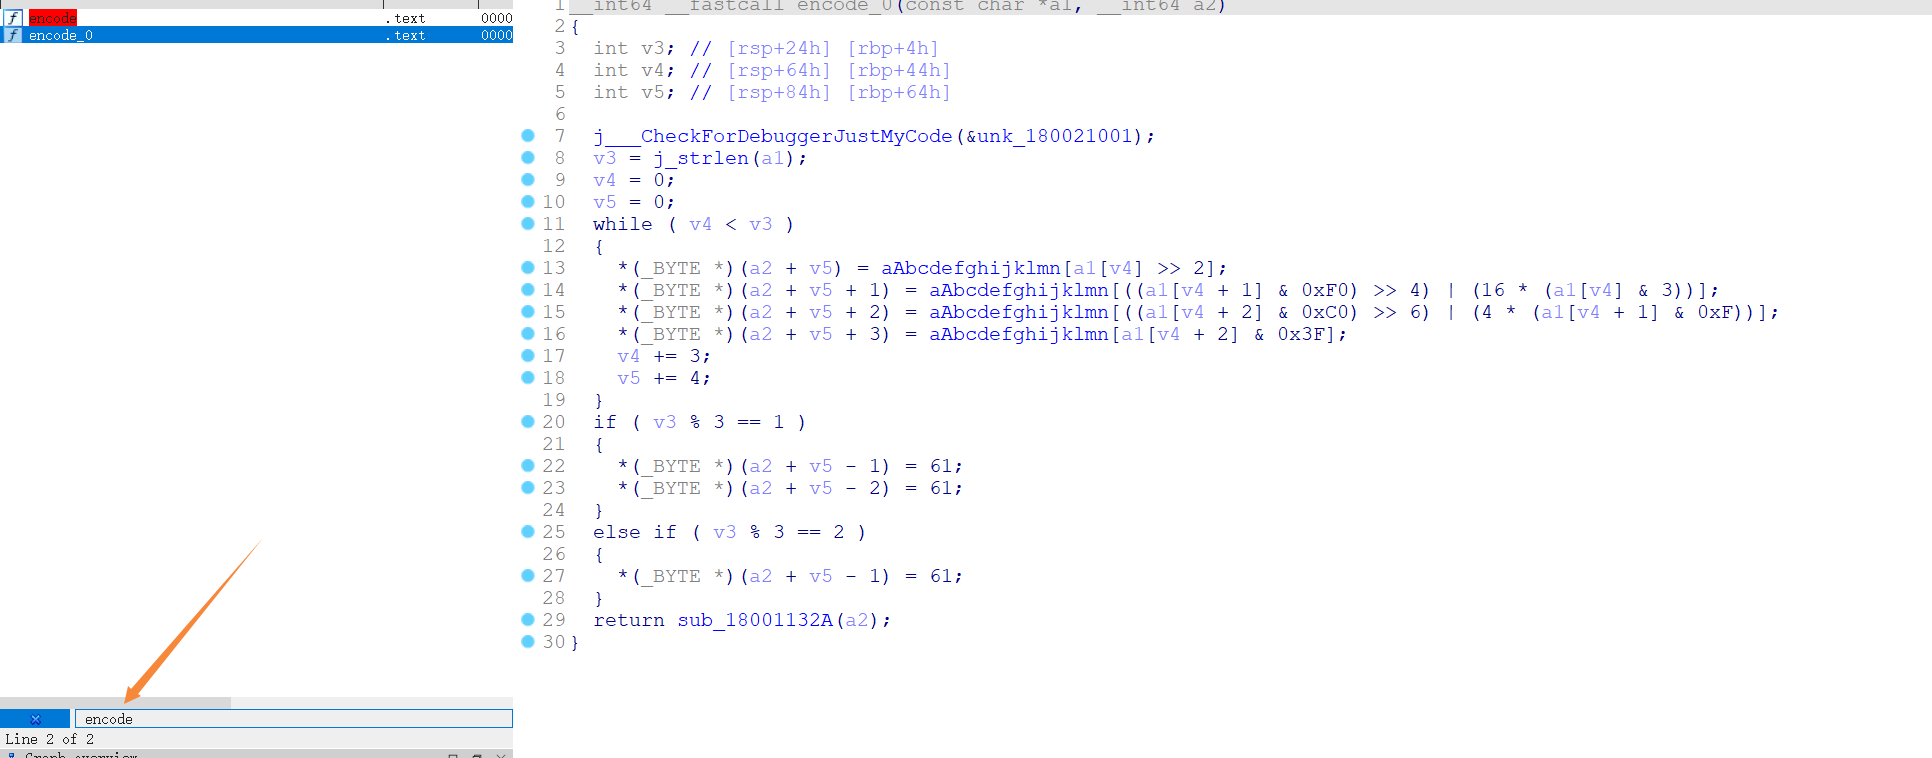
0x02 enc.dll 随后将该dll拉进IDA搜索encode函数(为什么出现两个encode,这其实是C++逆向的特性,具体原因以后会慢慢明白)
那么该加密可能第一次看比较陌生,但其实是最常见的BASE64编码,随后进入sub_18001132A函数
于一个字符串异或
1
2
3
4
5
6
7
8
9
const char *__fastcall sub_180011660 (const char *a1) int i; j___CheckForDebuggerJustMyCode(&unk_180021001); for ( i = 0 ; i < j_strlen(a1); ++i ) a1[i] ^= Str[i % j_strlen(Str)]; return a1; }
0x03 GetFlag 那么逆向的过程就是将密文异或字符串,再Base64解密即可
Base64的具体过程我不多说如果感兴趣可以去了解原理,毕竟以后入坑逆向会经常碰到各种魔改的换表的)
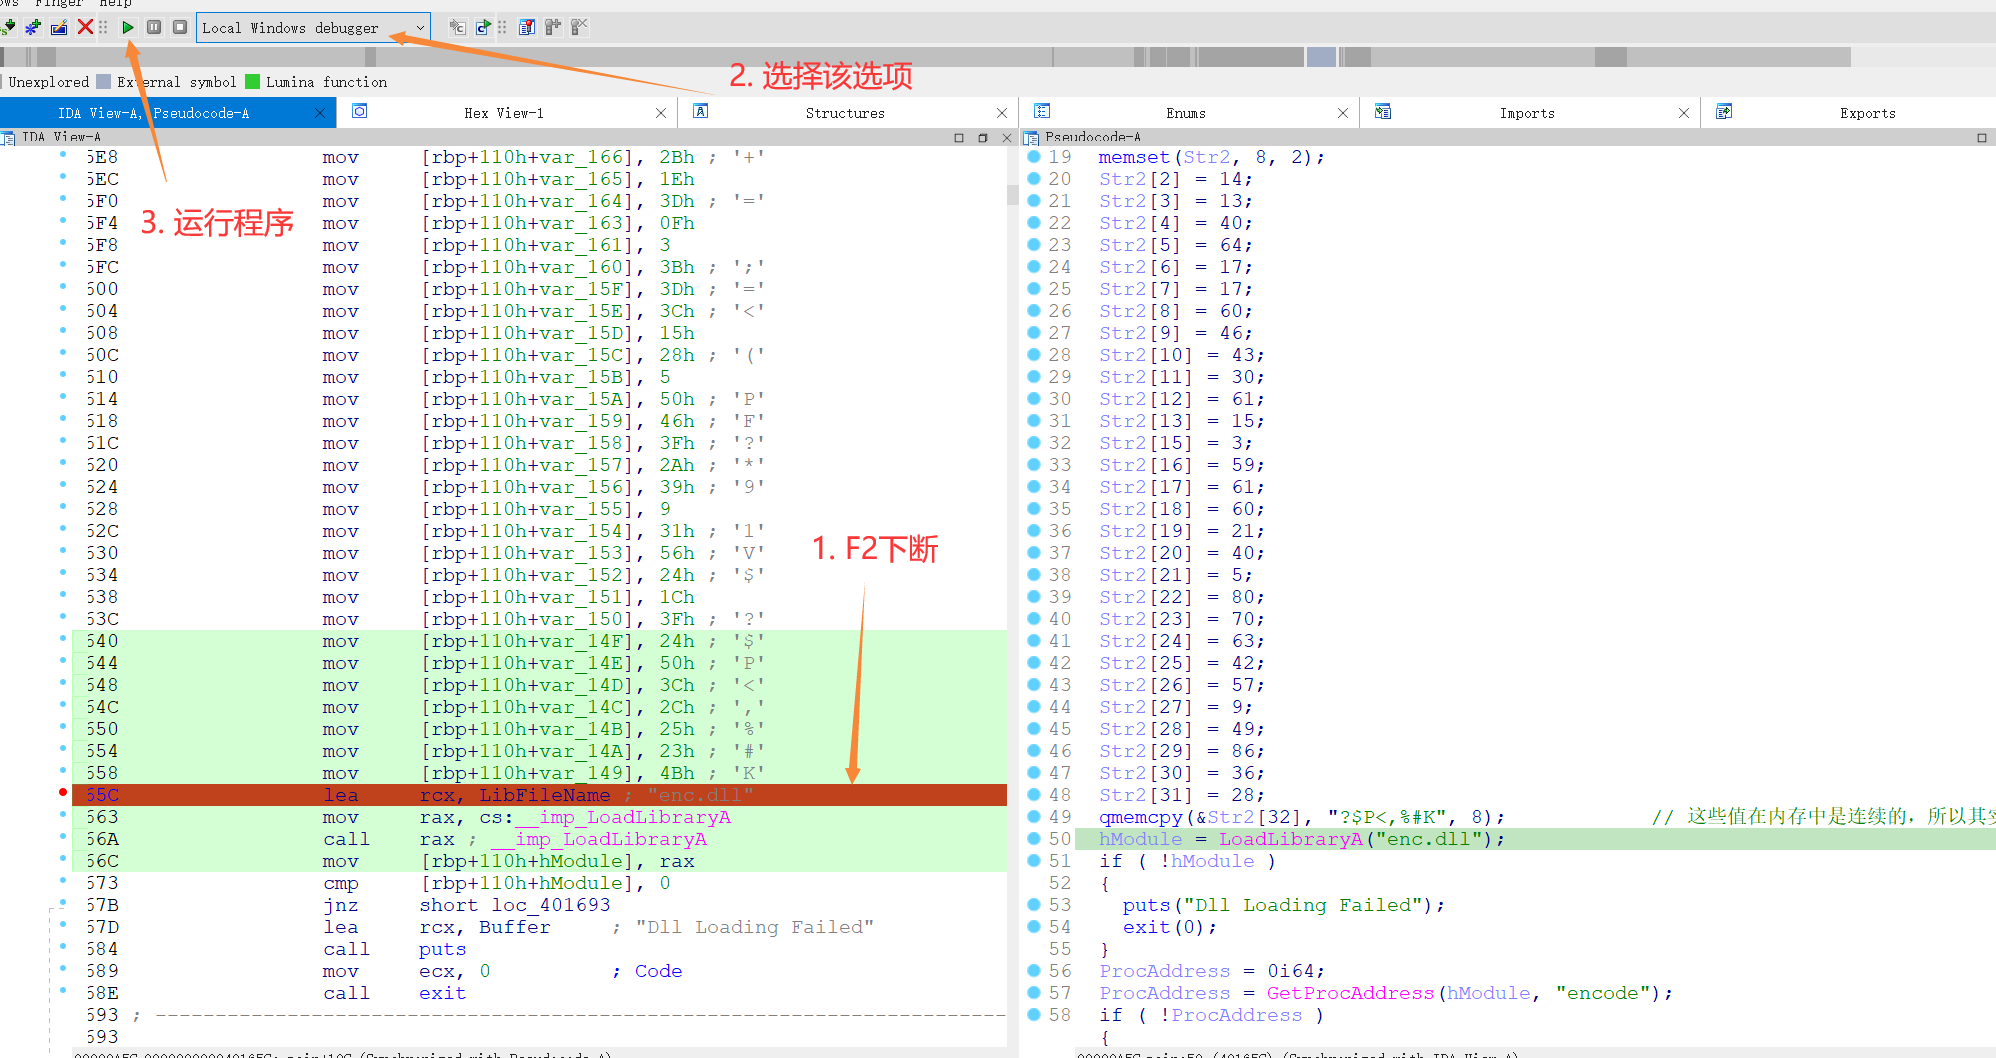
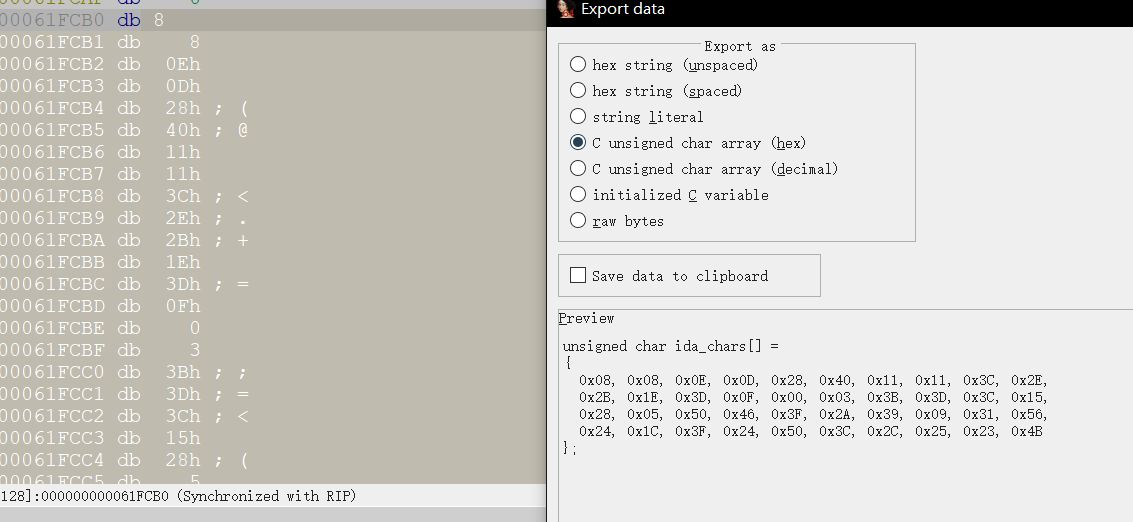
Take enc 那么该篇再引用一个IDA的技巧就是IDA动调,像该题的密文是这个样子,静态提取很麻烦,所以一个方法就是动调提取
随后一路yes即可,跑到该处!恭喜你,你成功第一次动态调试了
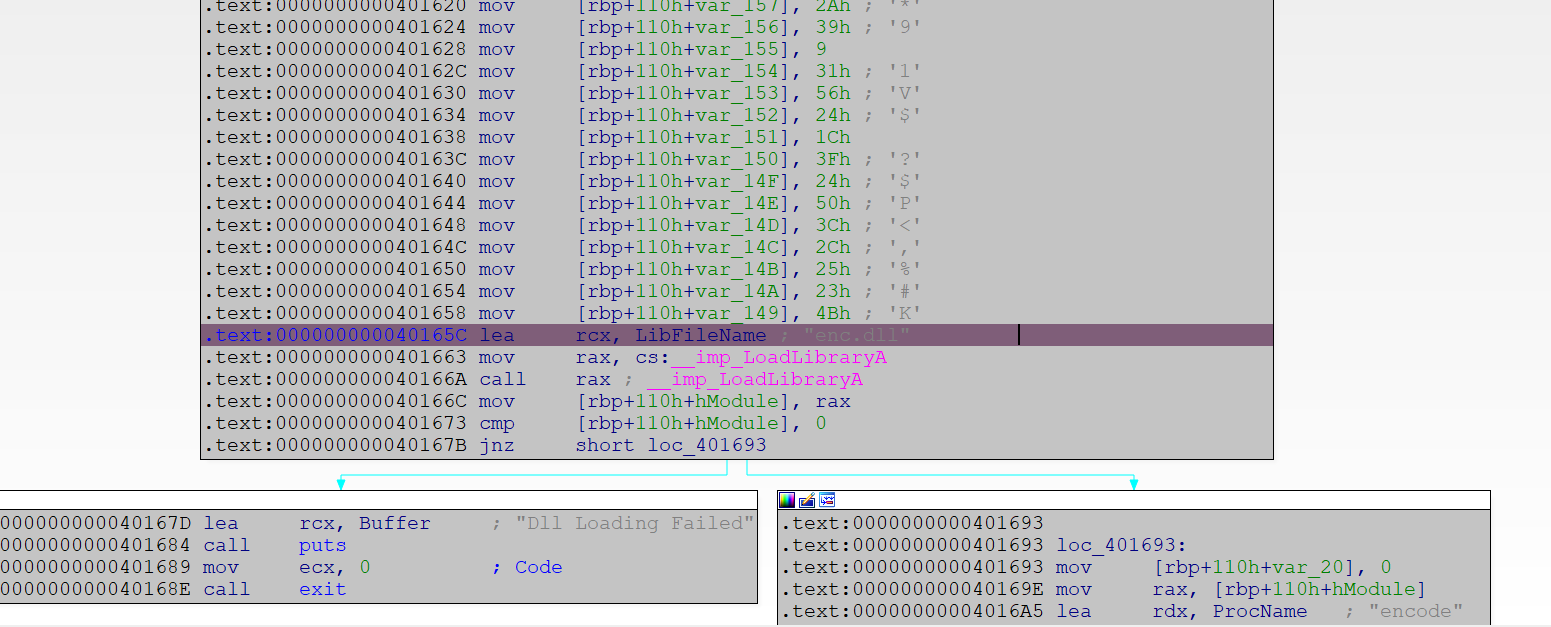
我们在任意一个[rbp+110h+var_149]按enter进入,可以发现就是我们此处的密文了
同样,全部选中按shift + e即可提取数据
既然有了密文直接解密即可
1
2
3
4
5
6
7
8
9
10
11
12
import base64enc = [0x08 , 0x08 , 0x0E , 0x0D , 0x28 , 0x40 , 0x11 , 0x11 , 0x3C , 0x2E , 0x2B , 0x1E , 0x3D , 0x0F , 0x00 , 0x03 , 0x3B , 0x3D , 0x3C , 0x15 , 0x28 , 0x05 , 0x50 , 0x46 , 0x3F , 0x2A , 0x39 , 0x09 , 0x31 , 0x56 , 0x24 , 0x1C , 0x3F , 0x24 , 0x50 , 0x3C , 0x2C , 0x25 , 0x23 , 0x4B ] key = "Reverse" for i in range (len (enc)): enc[i] = enc[i] ^ ord (key[i % len (key)]) print (base64.b64decode(bytes (enc)))
NewStarCTF-WEEK1-艾克体悟题 0x01 Frida hook 这题用JEB打开,看主程序可知只要点10000下,让FlagActivity.this.cnt变为10000即可
1
2
3
4
5
6
7
8
9
10
11
12
13
14
15
16
17
18
19
20
21
22
23
24
25
26
27
28
29
30
31
32
33
34
35
36
37
38
39
40
41
package com.droidlearn.activity_travel;import android.os.Bundle;import android.view.View$OnClickListener;import android.view.View;import android.widget.Toast;import androidx.appcompat.app.AppCompatActivity;public class FlagActivity extends AppCompatActivity private int cnt; public FlagActivity () super (); this .cnt = 0 ; } static int access$000 (FlagActivity arg0) { return arg0.cnt; } static int access$004 (FlagActivity arg1) { int v0 = arg1.cnt + 1 ; arg1.cnt = v0; return v0; } protected void onCreate (Bundle arg4) super .onCreate(arg4); this .setContentView(0x7F0B002D ); this .findViewById(0x7F080058 ).setOnClickListener(new View$OnClickListener(this .findViewById(0x7F080181 ), this .findViewById(0x7F080097 )) { public void onClick (View arg3) this .val$tv_cnt.setText(Integer.toString(FlagActivity.access$004 (FlagActivity.this ))); if (FlagActivity.this .cnt >= 10000 ) { Toast.makeText(FlagActivity.this , this .val$str.getText().toString(), 0 ).show(); } } }); } }
0x02 GetFlag 那么一个思路就是点一万下
另一个思路就是hook access$000 函数让该函数直接返回10000,判断就成立了,我们就GetFlag了
所以此时就可以用 Frida 了,就是在程序运行的时候 hook 返回值变为1000即可
1 ./data/local/tmp/frida-server # 进入shell Frida启动!
再进入一个shell 启动指定控件
1 am start -n com.droidlearn.activity_travel/com.droidlearn.activity_travel.FlagActivity
查看我们启动控件的PID
1
2
3
4
5
6
7
8
9
C:\Users\Pz>frida-ps -aU PID Name Identifier ----- --------------- --------------------------------------- 10738 Activity_Travel com.droidlearn.activity_travel 9870 Android Auto com.google.android.projection.gearhead 23407 Google com.google.android.googlequicksearchbox 9063 Google Play 商店 com.android.vending 9022 Google Play 电影 com.google.android.videos 11206 Magisk com.topjohnwu.magisk
接着我们就是 attach 上了
1
2
3
4
5
import fridadevice = frida.get_usb_device() session = device.attach(10738 )
接着可以编写我们的 js 脚本用来重写要hook的类方法
1
2
3
4
5
6
7
8
9
10
11
12
13
console .log("Script loaded successfully " );Java.perform(function x ( console .log("Inside java perform function" ); var my_class = Java.use("com.droidlearn.activity_travel.FlagActivity" ); console .log("Java.Use.Successfully!" ); my_class.access$000.implementation = function (x ) console .log("Successfully!" ); return 10001 ; } });
接着让我们的 js 脚本加载到该目标进程上即可
1
2
3
4
5
6
7
8
9
10
11
12
13
import fridadevice = frida.get_usb_device() session = device.attach(10738 ) with open ("hooook.js" , encoding='UTF-8' ) as f: script = session.create_script(f.read()) script.load() input ()
运行脚本,再点击 CLICK ME 即可!
GetFlag!
